Botany Bay Woods, Grange Rd, Eccles, Manchester M30 8JW 07761 409 427

Shooting Guides

Home Shooting Guides

Before you shoot

Three short guides for anyone coming to shoot with us: how we keep everyone safe, how to stand and hold the gun, and how to break the different targets you'll meet on our 27 stands. Your instructor will take you through all of this on the day.

Guide 1

Gun safety

Clay shooting is one of the safest outdoor sports there is, because everyone follows the same few rules every time. Learn these before anything else.

  1. Treat every gun as if it's loadedEven when you've been told it's empty, and even when it's open.
  2. Never point a gun at anyoneKeep the muzzles pointing in a safe direction at all times, loaded or not. On the stand that means down the range.
  3. Carry the gun open and emptyAway from the stand, carry it broken open over your forearm or in a gun slip, so everyone can see it's safe.
  4. Your instructor loads the gunOn the stand, your instructor loads the cartridges for you, with the muzzles pointing down the range. You never need to handle cartridges yourself.
  5. Keep your finger off the triggerUntil the gun is mounted and you're ready to shoot.
  6. Wear ear and eye protectionEvery time you or anyone near you is shooting. We provide both.
  7. Do as the instructor says, straight awayIf you hear "stop", stop, open the gun and keep the muzzles down the range.
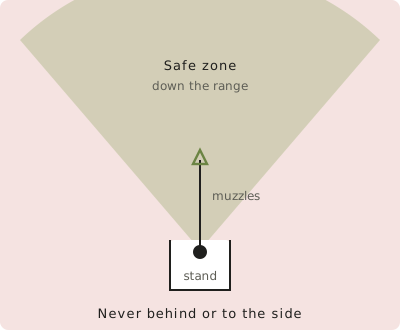
Top-down view of a shooting stand. The safe zone is a wide arc in front of the stand, down the range. Behind and to the sides is never safe.
On the stand, the muzzles stay inside the safe arc down the range. The stand's cage or frame stops the gun swinging too far round.

Carrying the gun between stands

An open gun is a safe gun. Break it open so the barrels drop, and rest it over your forearm with the barrels pointing at the ground. Anyone looking at you can see straight away that it can't fire.

Your instructor checks the barrels are clear and loads the gun for you on the stand.

Leave the cartridges to us. Your instructor loads every cartridge, so you can concentrate on the clays.
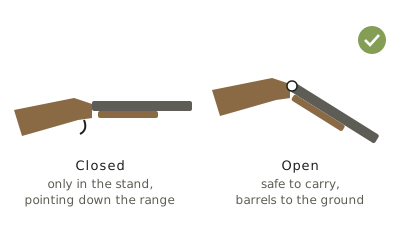
Two shotguns side by side. On the left, a closed gun marked "loaded or not, only on the stand". On the right, a gun broken open at the hinge with the barrels dropped, marked "open: safe to carry".
A break-action shotgun opens at the hinge. Open, the barrels can't fire, so this is how guns are carried everywhere except the stand.

If the gun doesn't fire

  1. Keep the gun mounted and pointing down the range.
  2. Don't open it or turn round.
  3. Stay still and let your instructor deal with it.

Never turn round with the gun to ask for help. The instructor will come to you.

Alcohol and shooting don't mix. No drinks before or during your shoot. Our clubhouse is there for afterwards.

Guide 2

Getting started

Three things make the biggest difference to a beginner: knowing which eye leads, standing the right way, and bringing the gun to your face the same way every time.

Find your master eye

Most people have one eye that takes charge. You'll shoot best from the shoulder on the same side as that eye, so we check it before you start.

  1. Hold your arms out and make a small triangle with your thumbs and fingers.
  2. With both eyes open, look through the triangle at something in the distance.
  3. Close your left eye. If the object stays in the triangle, your right eye is your master eye.
  4. If it jumps out of the triangle, try closing the right eye instead.

If neither eye is clearly in charge, your instructor will show you how to manage it, often by closing or dimming one eye as you shoot.

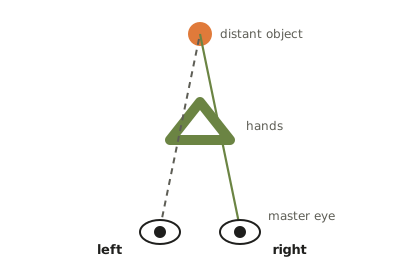
Eye dominance test. Two eyes at the bottom look through a triangle made with the hands at a distant object. The line from the right eye passes through the triangle to the object.
Here the right eye is in charge: its line runs straight through the triangle to the object.

Stance

Stand with your feet about shoulder width apart. For a right-handed shooter, the left foot points roughly where you expect to break the clay, and the right foot sits behind at an angle.

Keep a little bend in the front knee and lean slightly forward, with your weight on the front foot. This lets your whole upper body turn smoothly with the clay, instead of just your arms.

Left-handed shooters do the same the other way round.

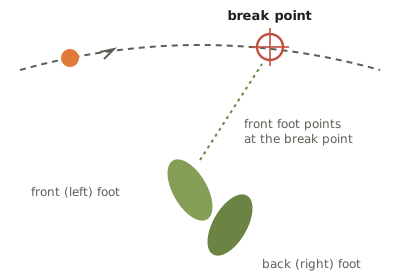
Top-down stance for a right-handed shooter. The clay flies across from left to right. The left foot points towards the break point where the clay will be shot, and the right foot sits behind at an angle.
Right-handed stance, seen from above. Turning from the hips lets you follow the clay all the way to the break point.

Mounting the gun

  1. Start with the gun just under your armpit, muzzles pointing where the clay will first appear.
  2. Look at the clay, not the gun.
  3. Push the gun towards the clay and bring it up to your face, so your cheek rests on the top of the stock.
  4. Bring the stock back into the pocket of your shoulder, just inside the shoulder joint.
  5. Keep your head still on the stock. Move the gun to your face, not your face to the gun.
Watch the clay, not the barrels. Your eyes pick the line, and the gun follows where you're looking. Keep both eyes on the clay right through the shot, and keep the gun moving after you pull the trigger.
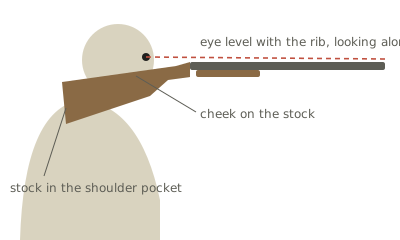
Side view of the gun mount. The cheek rests on top of the stock, the butt sits in the pocket of the shoulder, and the eye sits just above the rib, level with it, looking straight along it like a rear sight.
Your eye works as the back sight, sitting just above the rib and looking straight along it, not down onto it. If your head lifts off the stock, the shot goes high.

Guide 3

Hitting different targets

Don't worry, you don't need to learn any of this before you come. Your instructor will tell you exactly where to look and when to shoot.

Your first targets

Most of our corporate and beginner stands throw incomers, which fly gently towards you, or slight crossers, which drift across in front of you. They're chosen so you'll be breaking clays from the start.

Your instructor stands right beside you the whole time, so all you need to do is watch the clay and enjoy it.

An incoming target flying gently towards the shooter.
Incomer
A crossing target drifting across in front of the shooter.
Slight crosser

Want more of a challenge?

If you wish, you can try our harder stands. These go all the way up to competition level, and the tips below are how experienced shooters approach them.

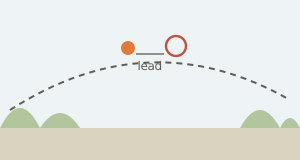
On a moving clay, the shot takes a moment to arrive, so you aim where the clay is going rather than where it is. That gap is called lead, and there are three common ways to find it.

Three ways to find the lead

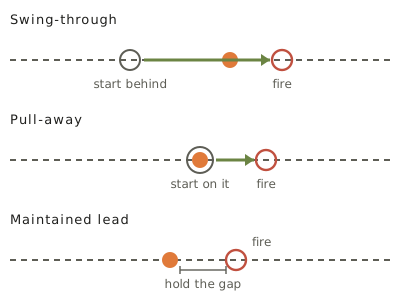
Swing-through: start behind the clay, swing through it, and pull the trigger as the barrels pass in front. The speed of your swing creates the lead.

Pull-away: mount on the clay itself, then pull ahead of it and fire. Good for beginners and for steady crossing targets.

Maintained lead: mount in front of the clay, match its speed while holding the gap, and fire. Often used on long, slow crossers.

Your instructor will pick the method that suits you and each stand. Whichever you use, keep the gun moving after the shot.

Three rows showing the clay moving left to right. Swing-through: the gun starts behind the clay and fires as it passes in front. Pull-away: the gun starts on the clay and fires after pulling ahead. Maintained lead: the gun starts ahead and stays ahead.
claywhere you firegun movement

Targets on our harder stands

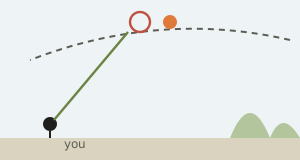
Each picture shows the clay's flight and roughly where to break it. The red ring is where the barrels should be when you fire. On the day, the right amount of lead depends on the speed, distance and angle, which is what your instructor will help you judge.

Crossing target flying left to right in a shallow arc, with the aim point well in front of the clay.

Crosser

Flies across in front of you. Shoot in front of it, on its line. The further away and faster it is, the more lead it needs. The most common miss is behind.

Driven target, seen from the side, coming high towards the shooter. The aim point is just in front of the clay as the barrels swing up through it.

Driven

Comes towards you high overhead, like a driven pheasant. Pick it up early, swing up through it and fire as the barrels cover it. Don't let it get right above you.
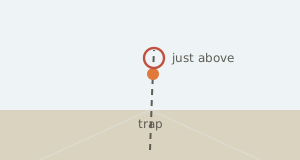
Going-away target leaving from near the shooter and rising away. The aim point is just above the clay.

Going away

Launched from near you and flying straight away, usually rising. It gets smaller fast, so take it early, and shoot just above it while it's still climbing.

Incoming target flying towards the shooter and dropping. The aim point is just below the clay.

Incomer

Flies towards you and starts to drop as it comes in. Shoot it in good time while it's still well out, holding slightly under it as it falls.
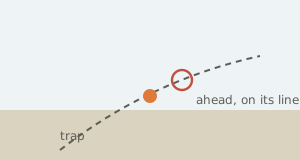
Quartering target flying away at an angle. The aim point is ahead of the clay along its angled line.

Quartering

Goes away or comes in at an angle, part crosser and part straight. It needs less lead than a crosser. Follow its line closely, as it's easy to shoot over or under the angle.
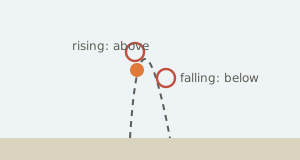
Springing teal launched almost straight up. One aim point is above the clay on the way up, another below it on the way down.

Springing teal

Shoots almost straight up, slows at the top, then drops. Choose your moment: above it while it's rising, or below it once it starts falling. The top of the climb, where it's slowest, is often the easiest point.
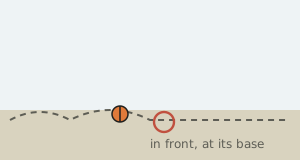
Rabbit target rolling and bouncing along the ground from left to right. The aim point is in front of and at the bottom of the clay.

Rabbit

A tough, edge-on clay that rolls and bounces along the ground. Look at its leading edge and shoot in front and low. Be ready for a bounce, and keep swinging.
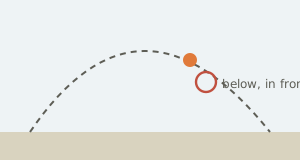
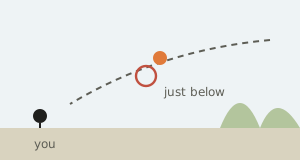
Looping target thrown in a high rainbow arc. The aim point is below and in front of the clay as it begins to drop.

Looper and battue

A looper is thrown in a high arc. A battue is a thin, fast clay that flies edge-on, then turns and drops. For both, wait for the turn and shoot below and in front as it falls.

Ready to give it a go? Our qualified instructors will put all of this into practice with you.

Book a lesson Call 07761 409 427

Ready for a great day out?

Book your shoot